You just got a new guitar. Congratulations! It might be tempting to rip the box to shreds and start playing immediately, but if you want the best first experience with your new instrument, there are a few things you should do first. Remember, first impressions are everything!
Here’s how to properly unbox a guitar to ensure the best playing experience — and hopefully achieve love at first strum.
Step 1: Open the Box Carefully
Yeah, new guitar day is exciting. But it’s important to keep your excitement somewhat in check as you open the packaging. You always hope your new guitar is love at first strum, but that’s not always the case. So make sure you don’t damage any of the packaging, just in case you need to take advantage of AMS’s super-awesome 45-day return policy.
Don’t open the box like a gorilla; carefully cut the tape with a knife and open the lid without damaging the cardboard. Same goes for any wrapping around the guitar. Take the rubber bands off and unroll the plastic/Styrofoam without tearing it.
The anticipation is more fun anyway…
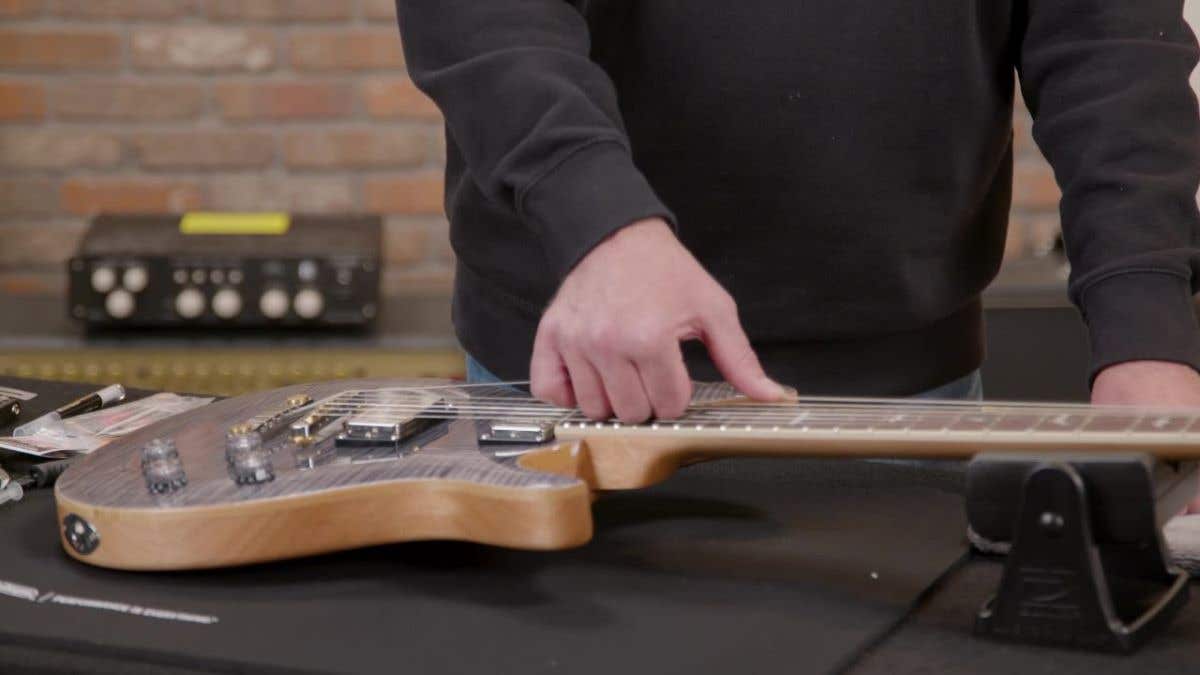
Step 2: Inspect Everything
Yay! Your guitar is officially out of the box. Now is the time to bask in its glory.
Inspect every little detail:
- Strap buttons are tight and secure
- Nut is seated and the slots are nicely cut
- Tuners are bushings are attached to the body and don’t move around
- Neck joint for gaps, fit, and finish
- Control plates secure
- Pots turn and feel good
- Pickups securely mounted to the body
- Pickup selector feels good
- Frets don’t have sharp edges, flat spots, or sprouts
- Fretboard is properly hydrated
- Binding is attached to the body
- Action isn’t too high or too low
Every detail shows the craftsmanship of the guitar. Every loose screw or sloppy cut could indicate other problems down the road. One of the best and quickest ways to check for problems during the inspection stage is to shake the guitar a little bit. If you hear rattling, there could be screws or parts loose.
Step 3: Set Up Your Workstation
You gave it a good once over. Now it’s time to really dig in. To avoid damaging anything (or getting overly frustrated) start by setting up your workstation.
There are a few tools you should have before you get started going over your new guitar:
- Neck cradle – holds your guitar neck up so you don’t hit the headstock on the table
- Setup mat – protects the guitar’s body and finish from sitting directly on the table
- Cleaning kit – polish, fretboard oil, etc.
- Microfiber cloth – please don’t use an old t-shirt…
- Guitar setup tools – string clippers, winder, wrenches, feeler gauges, etc.
Again, make sure you take care of the guitar during this step. You still don’t know if you’re going to return it, so don’t damage anything. Mats, cradles, gentle caresses, everything soft and plushy. That’s the way guitars like to be treated — at least when you first take them out of the box…


Dunlop 6503 Body and Fingerboard Guitar Cleaning Kit
Special Price $15.79
Dunlop DGT122 Complete Guitar and Bass Setup Tool Kit
Special Price $83.99

Step 4: Tune It Up
Your guitar will likely be out of tune when you first get it out of the box. That doesn’t mean the guitar can’t stay in tune; it just means they likely detuned it out of the factory. String tension can mess with your neck — especially in changing environments, like during shipping. Reducing the string tension helps avoid damage or messing up the factory setup.

Big Bends Nut Sauce Groove Luber Guitar Lubricant
Special Price $13.89
But before you start twisting any tuners, grab a tube of Big Bends Nut Sauce Groove Luber. Once all the middle schoolers (myself included) stop laughing, detune each string individually, pull it out of the nut slot, and put a drop of the nut sauce in the empty slot. This helps reduce friction as the string slides over the nut, keeping your guitar in tune, making any tuning adjustments smoother, and assisting with “Big Bends,” as the name might suggest. Then pop each string back into the correct slot.
Then you can get our your trusty tuner and tune up all the strings nice and slow. Listen to how the guitar resonates as you pluck the strings. Even electric guitars should make sound when they’re unplugged. Good resonation is an indicator of a well-built guitar.
Since these are probably new strings, it’s also a good idea to give them a little stretch at this step. Get your fingers under the string, then put your thumb on top and add a little bit of tension. Again, be gentle! Repeat the process a few times on each string. This removes any slack in the string and will keep the guitar in tune better.
Step 5: Check the Action
The action is your string height. Some players like a super-low string height that’s easy to fret, while others like it a bit higher for massive bends. Whatever your preference, this is the time to set that up.
Start by putting the bottom strap lock right up to your face and look down the length of the guitar from the bridge to the headstock. You’ll likely see a little bow in the neck, which is perfectly normal. Adjusting the bow of the neck using the truss rod is the easiest way to set the action how you like it.
If you’re not sure how to adjust the truss rod properly, check out this nifty blog: How to Adjust a Truss Rod.
Again again, be gentle with the truss rod. You can over adjust and damage the guitar. Quarter turns only!
Retune the guitar after any adjustments. Any changes in the neck will likely affect the tension on the strings. And as we all know, string tension = tuning.

Step 6: Set the Intonation
All the big stuff is taken care of, but there’s still one little thing to check before you get to playing. And that’s intonation.
Intonation is basically microtuning. Sure, your strings are in tune when you play them open, but are they in tune all the way up the neck?
The best way to check your intonation is to do the harmonic test. Fire up your tuner and make sure the string is in tune. Then lightly touch the string at the 12th fret and give it a pluck. You’ll hear a higher-pitched note ring out. That’s a harmonic. Take a peek at your tuner to see if that’s in tune. It might be a little bit sharp or flat compared to the open string.
Most electric guitar bridges can be adjusted to set the intonation. Look for little screws that move the saddle (the part the string touches) forward or backward. Tightening the screws moves the saddle back, elongating the string and lowering the pitch, while loosening the screws moves the saddle forward, shortening the string and raising the pitch.
- Harmonic is sharp: tighten the screw to lower the pitch
- Harmonic is flat: loosen the screw to raise the pitch
Just like when you’re tuning the strings, keep plucking and adjusting until the harmonic is exactly in pitch with the open string. Now you should be good to play in tune all the way up the neck!

Step 7: Play Test
Finally, it’s time to actually play some music! Acoustic guitarists, you’re free to go. Have fun. But if you got a new electric guitar or acoustic/electric, stick around for one more step. It’s time to test out all the features.
If your guitar has electronics, plug it in and see if it makes noise through the speaker. Then, it’s time to fiddle with the controls.
Acoustic/electric guitars will likely have only a few controls, like a volume and tone. Give each knob a twist, click, or whatever it does, and make sure you hear the appropriate change. If everything works and sounds good, you’re free to go!
Electric guitars have a few more knobs and buttons, and it’s important to test them all. If you have multiple pickups, use the pickup selector to test each pickup individually. Make sure all associated knobs (tone, volume) work properly. Also test out any active/passive, coil tapping, or any other features you might have.
Not only does this thorough feature test ensure your guitar works properly, but it’s also a great way to get to know your new guitar and everything it can do. You might stumble on an awesome setting that you would have never come across naturally.
Step 8: Have Fun!
With your guitar unboxed, set up, in tune, and sounding nice, you’re finally free to have some fun!
Congratulations on your new purchase! There’s (almost) nothing better than getting a new guitar or bass to play with. Thanks for letting AMS be a part of the journey.

Schecter Demon 7 Electric Guitar Aged Black Satin
Special Price $649.00
Schecter Sunset 7 ET Red Dawn 7-String Electric Guitar Gloss Black
Special Price $1,599.00
Schecter Keith Merrow KM-7 MKIII Artist L Guitar Lagoon Fade
Special Price $2,199.00
Ibanez Iron Label RGIXL7 7-String Electric Guitar Black Flat
Special Price $1,099.99
Ibanez Iron Label RGRB720 Electric Guitar Black Flat
Special Price $1,199.99